Reloading an image on interval

This may not be the appropriate place to ask, or maybe it is?

I’m trying to build a poor-man’s video “stream”. It’s more of a time-lapse than it is a stream.

I’ve set up a simple webcam on a vacation property I manage. Every 10 seconds I use a Linux command to snag an image from the camera and transfer that frame (a JPG file) to the /wp-content/uploads folder of a WP installation. The filename never changes.

I want to display this JPG on my BB website and I want the image (not the page) to refresh every 10 seconds.

The idea here is that a person can visit my site, land on a page that displays the image, and sort-of watch the scene in pseudo real time.

Is this a pipe-dream?

No, lots of people have done this over the years, this post will get you started

1 Like

Here there @pross … thank you for the lead!!

1 Like

@pross … And here’s where I come back “hat in hand” to say that I’m a JS newb and frankly don’t know where to begin with that snippet of code.

The image that needs to be refreshed is named “snapshot.jpg”. It is located in the /wp-content/uploads directory.

I added the following to the Javascript tab on “Layout CSS / Javascript” of the page displaying the image…

setInterval(function(){
    jQuery("#myimg").attr("src", "/snapshot.jpg?"+new Date().getTime());
},2000);

I gave my image element an ID of myimg.

After clearing the cache and reloading the page I’m pretty sure that absolutely nothing is happening.

May I bother you to kick me a little further down the trail and tell me where I’m botching this up?

Exactly what element did you add #myimg to?

/snapshot.jpg is a relative url, so will translate to https://whatever-your-site-is.com/snapshot.jpg

Yes, you’re picking up on my newbie-ness.

I used the standard BB “Photo” module and selected the snapshot.jpg image I referenced earlier. Within that module, under the Advanced tab, I added myimg to the field labeled ID.

I modified the jQuery code to read…

    setInterval(function(){
        jQuery("#myimg").attr("src", "/wp-content/uploads/snapshot.jpg?"+new Date().getTime());
    },2000);

I have great confidence that I didn’t do this correctly at all.

I’m doubling-back on this topic to post my eventual, full solution. Using @pross initial hint as a launching point I next engaged perplexity.ai to figure out what might still be missing, and to provide recommendations on where exactly to place the code.

Perplexity did a great job of showing me where the code was supposed to appear on the page, and its example helped me see that I should have just been using the HTML module of BB to create an img tag with an ID that matched what was used in the jQuery script (img#myimg). My approach of using BB’s Photo module was waaaay off.

One thing that confused me (and still confuses me) was BB’s “Tools → Layout CSS & Javascript → JavaScript” tab. I figured out what jQuery code was needed and, while using BB to edit the page containing the image, I pasted the code into the page’s JavaScript tab. I would then save the page, clear the server’s cache and my browser’s cache, refresh the resulting page, and them review its source. Never once did the code entered on BB’s JavaScript tab appear within the resulting page’s source. I can only assume that I did something syntactically wrong that caused BB to omit the code from being loaded into the page.

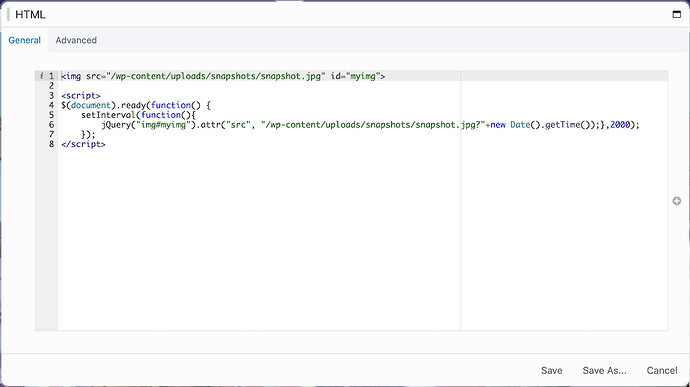
Since the JavaScript wasn’t populating to the page as expected, and knowing that it just needed to appear somewhere in the body section, I decided to glom it all together and dump everything directly into the HTML module. It ended up looking something like this…

This got me over the hurdle and seems to work wonderfully. The images are probably refreshing too frequently, so I will probably change the interval from 2000 (2 seconds) to something a little greater.

This was a fun and challenging project involving a Wyze Cam v3, beta firmware that enabled its RTSP functionality, a variety of Linux utilities to pull images from the cam and eventually push them to my Web server.

I hope this helps someone in the future.

Here’s the TXT of the code I used in the HTML module…

<img src="/wp-content/uploads/snapshots/snapshot.jpg" id="myimg">

<script>
$(document).ready(function() {
	setInterval(function(){
	    jQuery("img#myimg").attr("src", "/wp-content/uploads/snapshots/snapshot.jpg?"+new Date().getTime());},2000);
	});
</script>
1 Like

Nice job sussing it out :slight_smile:

I would have done it slightly different and still used the photo module so you can take advantage of its styling controls etc

jQuery(document).ready(function() {
    var img = jQuery('#myimg img');
    var src = img.attr('src');
	setInterval( function() {
        img.attr('src', src + '?' + new Date().getTime() );
    }, 2000 );
});

When you add myimg as an ID in the module it adds the ID to the module wrapper not the actual image, thats why your code would not work.

Thanks @pross . I’m all about this, but I have two questions:

  1. Where exactly does one add the ID to the image when using the Photo module?
  2. Where does the jQuery script go (e.g. Photo [module] → Advanced → JavaScript)?

Something about this code… it looks quite a lot like the original block of code I received from Perplexity.ai when I asked for an example of what to use to make this work. I used the code snippet on my page and was pleased to see the images refreshing every 2 seconds… until they didn’t. If I refreshed the entire page the script would run fine for a few minutes, and then would return a broken image icon in place of the actual image.

What I realized was that the script was concatenating the date/time with every iteration of the loop (it wasn’t clearing the initial date/time and replacing it with most recent date/time). Eventually the resulting URI became too long for the browser to accommodate and the loading process failed.

I just ran this by Perplexity again and it provided this (untested) code as a solution…

jQuery(document).ready(function() {
    var img = jQuery('#myimg img');
    var baseUrl = img.attr('src').split('?')[0];  // Get the base URL without any query parameters

    function updateImage() {
        var newSrc = baseUrl + '?' + new Date().getTime();
        img.attr('src', newSrc);
    }

    // Initial update
    updateImage();

    // Set interval for subsequent updates
    setInterval(updateImage, 2000);
});

Yea I dunno why you had to change it lol, I tested my own code before pasting it here, it worked perfectly fine.

I dont trust any AI code, ive seen it take servers offline. Use code you understand :wink:

src is always the image src attribute, the reason we use the variable is so its always the same, with no variables added at the end, we do this in the setinterval function

@pross … I shouldn’t have complicated things by posting twice in succession. Can you elaborate a bit more on the 2 questions I posted at 10:07am EST?

Where exactly does one add the ID to the image when using the Photo module?

In the advanced tab of any row/col/module there are options there to add class or ID but both are added to the module wrapper NOT the actual image, which is why I had to use the selector #myimg img rather than just #myimg

Where does the jQuery script go (e.g. Photo [module] → Advanced → JavaScript)

You could add it there, or the layout JS for the page. You have to remember when you add the JS there not to include <script> HTML tags, because they are HTML tags not javascript.

1 Like

This topic was automatically closed 36 hours after the last reply. New replies are no longer allowed.